This post was originally posted on my personal blog, visit the post here.
This post is the final part of sql injection series. If you missed the first part, you can read it here.
What We Will Be Creating
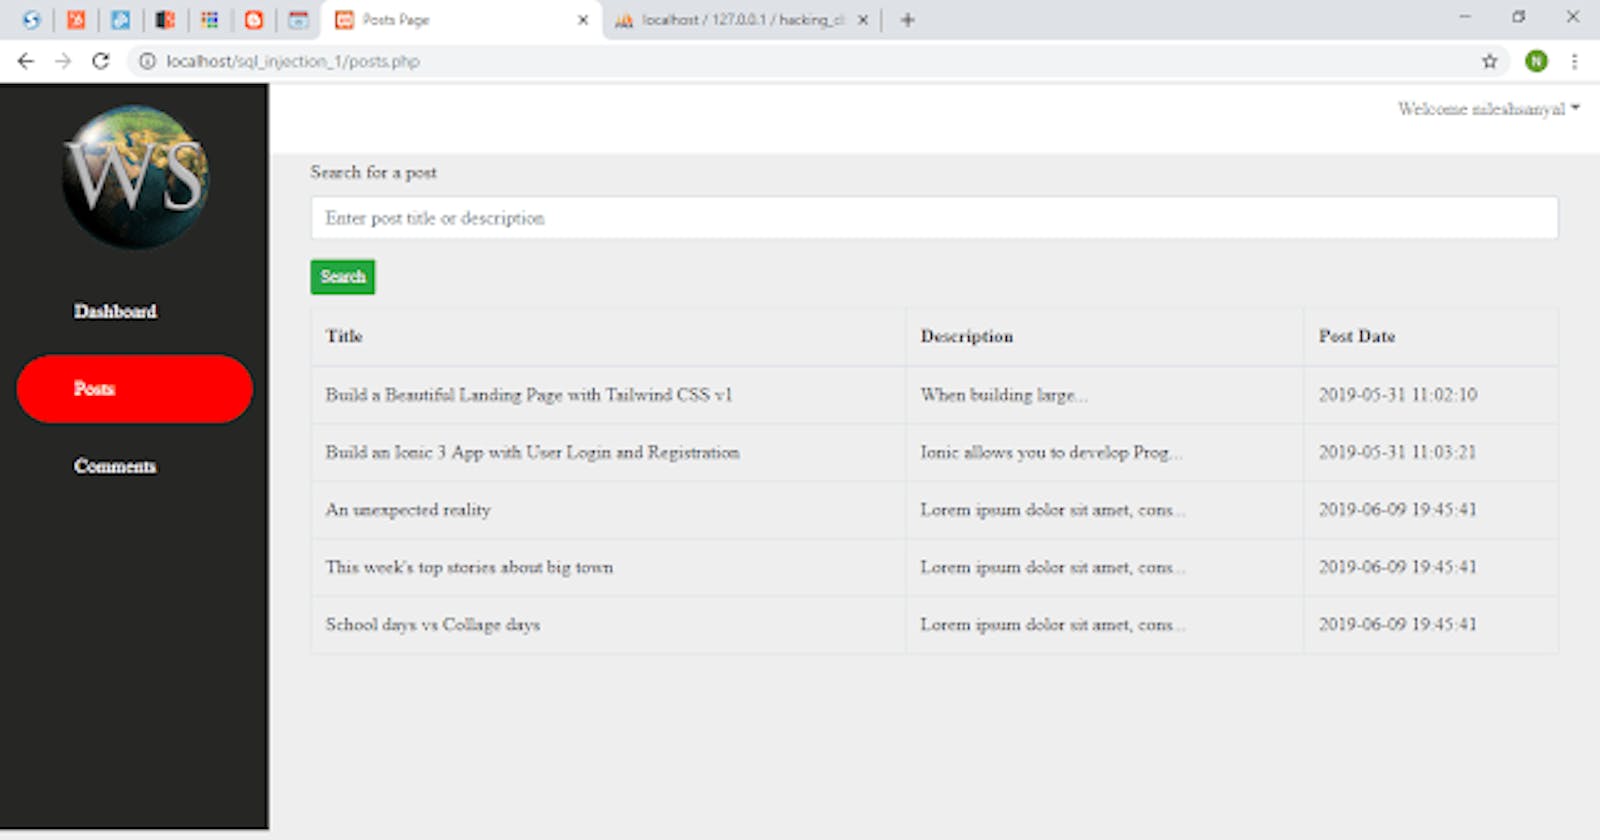
We will create a post listing page, where user can search any post by entering post title or description.

Creating The Posts Table
You may wonder that how the posts are displayed in the post page. If you see the screenshot above, user is unable to create posts, as no form is provided for the them to do that.
Well, I did it intentionally, so that you can focus on learning the inner-workings of sql injection in depth.
To make the posts visible in that way, we need to create the posts table using php myadmin utility that we can use by entering this url "localhost/phpmyadmin" in the browser, after we start apache server and mysql database service from the XAMPP control panel.
The table structure for the posts table is as follows.
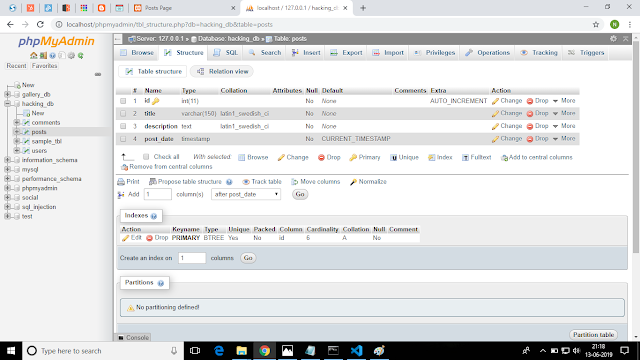
The data for the posts table is as follows.

Codes for posts.php page is given below.
<?php session_start(); ?>
<?php
    if($_SESSION['session_username'] !='' && !empty($_SESSION['session_username'])){
?>
<!DOCTYPE html>
<html lang="en">
    <head>
        <meta charset="UTF-8">
        <title>Posts Page</title>
        <link href="css/bootstrap.min.css" rel="stylesheet" id="bootstrap-css">
        <link href="css/dashboard.css" rel="stylesheet">
        <link rel="stylesheet" href="css/datatable/dataTables.bootstrap4.min.css">
    </head>
    <body>
        <nav class="navbar navbar-expand-lg navbar-dark fixed-top" id="mainNav">
            <button class="navbar-toggler navbar-toggler" type="button" data-toggle="collapse" data-target="#navbarResponsive" aria-controls="navbarResponsive" aria-expanded="false" aria-label="Toggle navigation"><span class="navbar-toggler-icon"></span></button>
            <div class="collapse navbar-collapse" id="navbarResponsive">
                <ul class="navbar-nav navbar-sidenav">
                    <a class="nav-link navlogo text-center" href="dashboard.php">
                        <img src="images/WS_Logo.png">
                    </a>
                    <li class="nav-item">
                        <a class="nav-link sidefrst" href="dashboard.php">
                            <span class="textside">  Dashboard</span>
                        </a>
                    </li>
                    <li class="nav-item">
                        <a class="nav-link sidesecnd active-nav-item" href="posts.php">
                            <span class="textside">  Posts</span>
                        </a>
                    </li>
                    <li class="nav-item">
                        <a class="nav-link sidesthrd" href="add_comment.php">
                            <span class="textside">  Comments</span>
                        </a>
                    </li>
                </ul>

                <ul class="navbar-nav2 ml-auto">
                    <li class="dropdown">
                        <a href="#" class="dropdown-toggle" data-toggle="dropdown">Welcome <?php echo $_SESSION['session_username']; ?></a>
                        <ul class="dropdown-menu">
                            <li class="resflset"><a href="logout.php"><i class="fa fa-fw fa-power-off"></i> Logout</a></li>
                        </ul>
                    </li>
                </ul>

            </div>
        </nav>
        <div class="content-wrapper">
            <div class="container-fluid">
                <div class="row"> <br>
                    <div class="col-md-12 text-right" style="margin-top: 3px;">
                        <a class="btn btn-primary btn-md" href="add_post.php">Add Post</a>
                    </div>
                    <div class="col-md-12">
                        <form method="get" action="">
                            <div class="form-group">
                                <label>Search for a post</label>
                                <input type="text" name="title" placeholder="Enter post title or description" class="form-control">

                            </div>
                            <input type="submit" value="Search" name="searchBtn" class="btn btn-sm btn-success">
                        </form>
                    </div>
                    <div class="col-md-12" style="margin-top:10px;">
                        <table id="post_tbl" class="table table-hover table-bordered" style="width:100%">
                            <thead>
                                <tr>
                                    <th>Title</th>
                                    <th>Description</th>
                                    <th>Post Date</th>
                                </tr>
                            </thead>


                            <?php
                                $conn = mysqli_connect("localhost", "root", "", "hacking_db");
                                if(!$conn){
                                    die("connection error");
                                 }

                                $search_keyword = isset($_GET['title']) ? mysqli_real_escape_string($conn,  $_GET['title']) : '' ;

                                $posts_sql = "select * from `posts` WHERE title LIKE '%$search_keyword%' OR description LIKE '%$search_keyword%' ";

                                $posts = mysqli_query($conn,$posts_sql);

                             ?>

                            <tbody>

                                 <?php
                                    if(!$posts) { ?>

                                        <tr>
                                            <td><?php die("Error: " . mysqli_error($conn)); ?></td>
                                        </tr>

                                <?php    } ?>


                                <?php
                                    if(mysqli_num_rows($posts) != 0){
                                        while($postsRow = mysqli_fetch_array($posts)) {
                                 ?>
                                        <tr>
                                            <td><?php echo isset($postsRow['title']) ? $postsRow['title'] : ''; ?></td>
                                            <td>
                                                <?php echo isset($postsRow['description']) ? mb_strimwidth($postsRow['description'], 0, 35, "...") : ''; ?>
                                            </td>
                                            <td>
                                                <?php echo isset($postsRow['post_date']) ? $postsRow['post_date'] : ''; ?>
                                            </td>
                                        </tr>
                                <?php
                                        }
                                    }  else {

                                ?>

                                <tr>
                                    <td colspan="3">No posts found!</td>
                                </tr>

                                <?php
                                    }
                                    mysqli_close($conn);
                                ?>


                            </tbody>
                        </table>
                    </div>
                </div>
            </div>
        </div>
        <script src="js/jquery.min.js"></script>
        <script src="js/bootstrap.min.js"></script>
    </body>
</html>
<?php } else {
    header('Location: login.php');
} ?>
Explanation of posts.php
In this page, at first we checked if the user is already logged in or not. If the user is logged in then he or she can view the posts page, otherwise he or she is redirected to the login page.
We took the search keyword from the textbox, when user submits the form, we collect the textbox content through GET request.
Then, we checked if any match is found by comparing post's title or description with the search keyword. If any match is found we display the results in a table. If no posts exist matching the exact keyword, we displayed a message "No posts found!".
If for some reason, the database is unable to process the search keyword, we displayed a sql error to the user.
Extracting The Complete Database Details
We completed the posts search functionality for this application. Let's see how to exploit this application, so that we can get the complete database details from it. For this purpose, we will be using UNION operator of MySQL database.
Basics Of UNION Operator
UNION operator is used so that we can chain together multiple results of two or more sql statements.
Each SELECT statement withing UNION, must have equal number of columns.
So, we now know, what are the basic requirements to run UNION statements successfully. Let's see how we can do that.
To do that, we need to use ORDER BY clause of MySQL. We will enter a specific ORDER BY statement in search textbox and see if any sql error is displayed. If this happens, then we will simply decrease the numeric value that we used in that ORDER BY clause.
If we saw, "No posts found!" message, then it's ok, we can check again by increasing the numeric value that we used in the ORDER BY clause. After completing this step, we can get total number of columns in the posts table.
The screen shot of first attempt is shown below.

The screen shot of final attempt is shown below.

From the above screen shot, we saw the error message. So, we know that, the posts table contains exactly 4 columns.
Let's use this information to get a lot of information about the database that is being used in this application.
Getting MySQL Database Name

Getting MySQL Database Tables
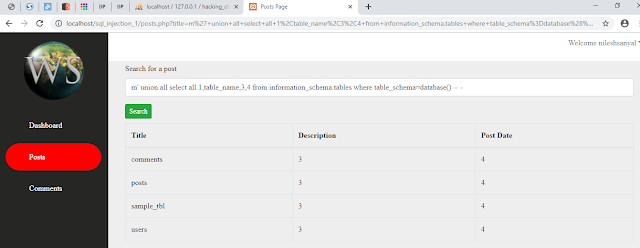
Getting Columns Of users Table
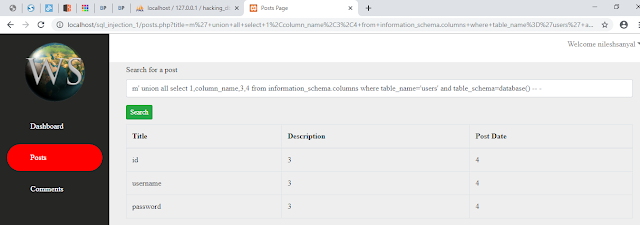
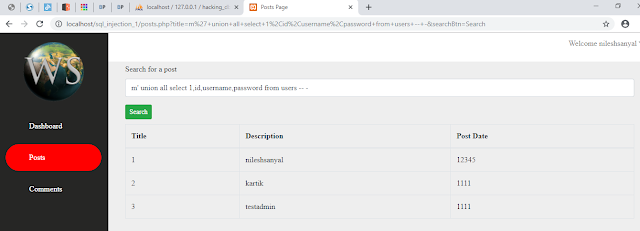
Getting id, username and password Columns Of users Table
Preventing SQL Injection
If you want to prevent SQL Injection, then this section will help you to understand preventing SQL Injection completely. If you don't know what is sql injection, you can read it here.
In order to prevent SQL injection, you will able to get a set of practical examples, so that you won't find it difficult to understand the concept.
What We Will Do
Previously, we saw how an attacker used sql injection to bypass login, exploit the database and was able to get detail information about the database. Now, we will stop the attacker from doing that.
Protecting The Login Page
In the following screen shot, the highlighted text marked in white color, will protect all types of sql injection attacks.
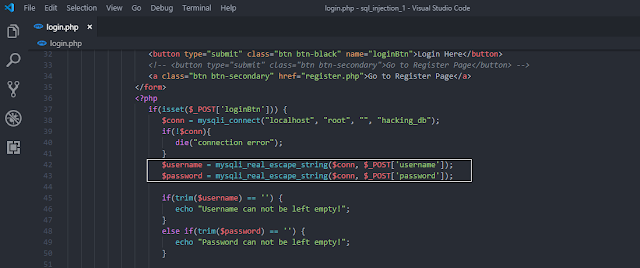
After making those changes, refresh the login page, and try doing that login bypass attack again, you will see something like the screen shot shown below.

Protecting The Posts Page
Simply, add marked code as shown in the screen shot below.
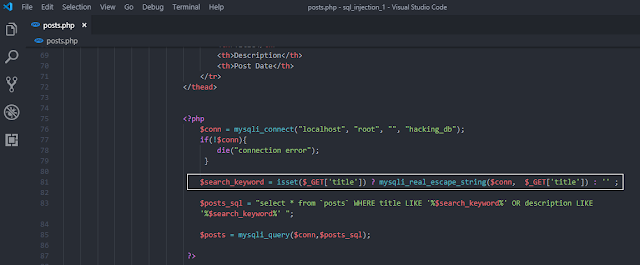
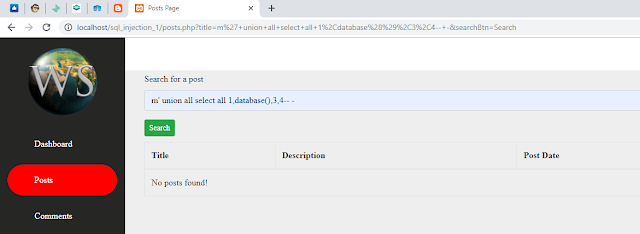
After completing this step, try executing sql injection attacks that used union statement. You will see similar outcome as shown in screen shot below.
Final Words
If you find this post about learning sql injection step by step part 2 as helpful, please share it with others. Thank you!
