Read original article here
When you start learning AWS, you should have a clear understanding of networking essentials. After you get an AWS account, AWS creates a default network space for you. Either you can use that or if you have a different use case, you have to configure different networking components under AWS.
This article will guide developers to start their journey on AWS by introducing networking fundamentals with easy-to-understand examples. After you go through the article, I am sure that you will be in a good spot to tackle different networking challenges faced in your career.
Before you understand the intricacies of AWS networking, I expect you to have a clear understanding of the below-mentioned topics.
Fundamental networking concepts.
Fundamental understanding of IPv4 addressing.
Once you have a clear understanding of the above topics, you can return to this article. You can refer to the links above to gain knowledge on the topics mentioned above.
You may be wondering how IP addressing is related to AWS networking, let's first discuss that.
How IP Address Comes Into the Picture
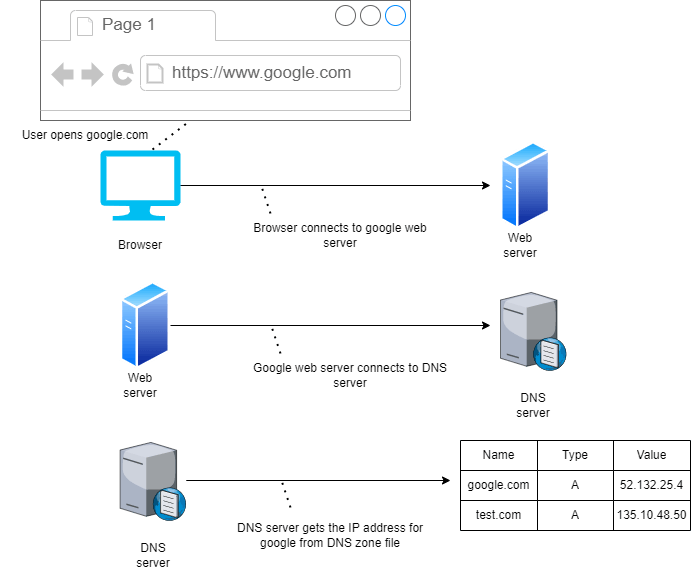
From the diagram shown above, we can say that whenever we open google.com or any valid URL in the browser, the browser connects to the web server. The web server contacts the DNS server as it does not know anything such as Google, it identifies only IP address. Then DNS server gets the appropriate IP address from the DNS zone file for the URL that we typed in the browser’s address bar. In this scenario, it’s google.com. If it finds it, it will show the Google home page in a browser.
What is Cloud Networking
Cloud networking provides the ability to manage, operate, build, and securely connect the networks created by you across all of your cloud environments and distributed cloud and edge locations. Cloud networking allows you to architect infrastructure that is resilient and highly available which are some features of a cloud-native application. It also helps you to deploy your applications faster, at scale, and closer to your end users when you need it.
Now, that you understood cloud networking, let's now discuss the various underlying parts of it in depth.
What is Amazon VPC
You can think of VPC or Virtual Private Cloud as a flat that you have taken on rent. With VPC, you can provision logically isolated sections of the AWS cloud where you can launch different AWS resources in a virtual network that you define.
You have complete control over the things mentioned below.
Virtual networking environment including the selection of own IP address ranges
Creation of subnets
Configuration of route tables
Configuration of network gateways
If you want, you can also create a hardware virtual private network connection between your corporate data center and your VPC, which in turn will allow you to connect servers between the two as if they were on the same network.
If you don't understand what I mean by a selection of own IP address ranges, subnets, route tables, and network gateways. Don't worry, I will explain each one of them in great detail along with practical examples.
Different Components of VPC
There are different components that are part of VPC. Let's discuss them one by one first.
Region and Availability Zone
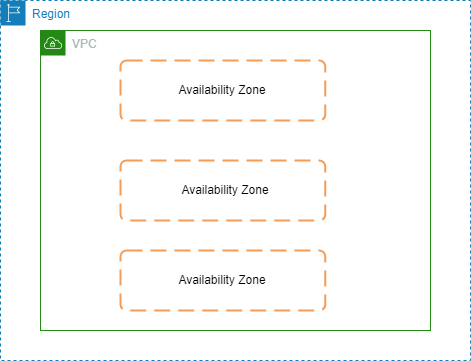
You can easily customize the network configuration for your VPC based on your requirements. A VPC spans a whole region, so within a region, we have our VPCs. VPCs can't span across regions.
Specifically, the logical isolated space provided by VPCs are different than the public space outside of the VPC, where services like Amazon S3 sit. This is a private space, and you have full control over how you can configure the VPC. The diagram below depicts these facts.
Subnets
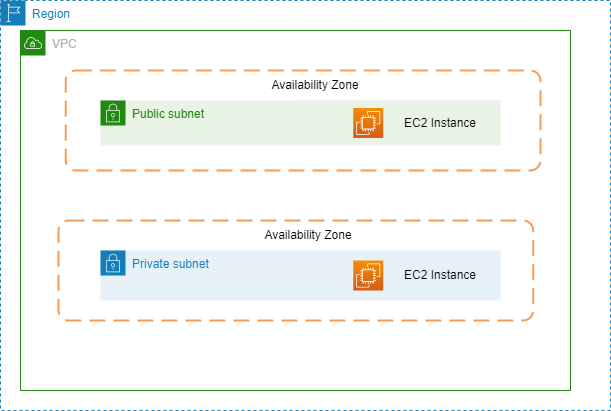
Now, within a region, we have availability zones, and you can use those inside VPC with the help of creating something known as subnets and assigning those subnets to an availability zone, it can't span across multiple AZs (Availability Zones).
You can connect a subnet to the internet, to other VPCs, and also to your own data centers. You can also route traffic to and from your subnets using route tables.
But, we can have multiple subnets in the same AZs. Then also we can deploy our resources such as EC2 instances into those subnets. The diagram below explains this fact.
VPC Router
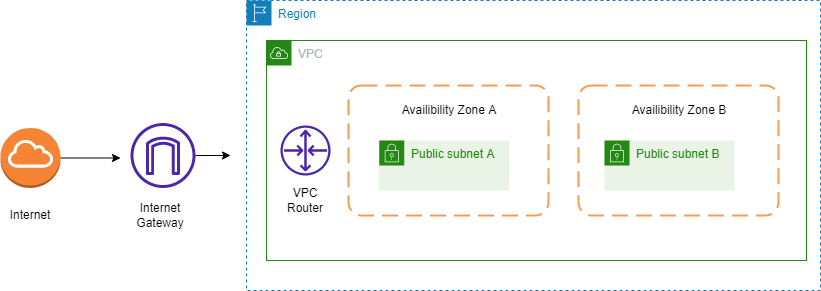
You can’t see the VPC Router, but we configure it while we configure the route table. VPC router takes care of all routing for connections that are going outside of a subnet. Route table configures the VPC router for you behind the scene.
Internet Gateway
If we want to access the internet, we also need an internet gateway. It is attached to your VPC, you can have only one internet gateway per VPC. The internet gateway is used to send the data out to the internet. That is known as egress traffic. When it is used to send the data in from the internet it is called ingress traffic.
Route Table
We configure our route table with a route to the internet gateway ID, which tells it to send all traffic that doesn’t fit one of the networks in the route table before it to the internet gateway.
Note: You can create multiple VPCs within a region. But, you have a limit of 5 by default. Although, you can request to increase that as well.
CIDR Block
CIDR blocks play a vital role in AWS networking. Each VPC has a CIDR block, that’s the overall block of addresses from which you then create the addresses you assign to your subnets. So, you can think of it as a master block of addresses. Each VPC has a different CIDR address. From the diagram below you can observe that 2 VPCs have 2 different CIDR blocks.
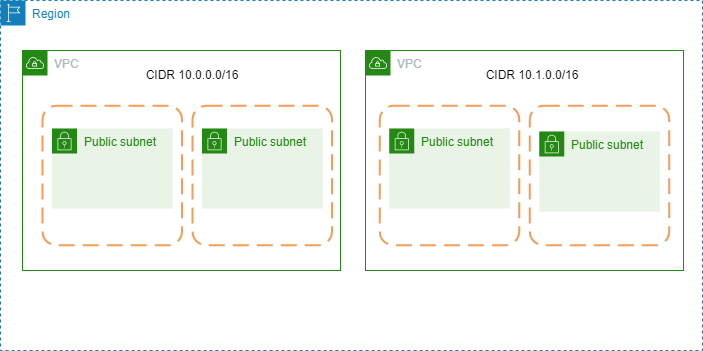
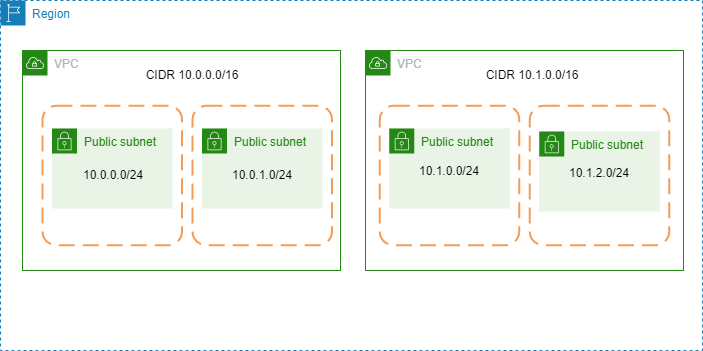
CIDR stands for Classless Inter-Domain Routing. From the overall CIDR blocks, we can create Network IDs for our subnets. They are within that overall CIDR block but, they have a different subnet mask, so that is essentially a subset of the overall available addresses this is why it’s really important to make sure we specify our CIDR blocks correctly so that we have enough networks and enough hosts per network.
From the diagram below you can observe that as well.
Rules for Defining CIDR Blocks
CIDR block size can be between /16 and /28.
The CIDR block must not overlap with any existing CIDR block that’s associated with the VPC.
You cannot increase or decrease the size of an existing CIDR block.
The first four and last IP addresses are not available for use.
AWS recommends that you use CIDR blocks from RFC 1918 ranges:
The below table explains different ranges that fall under RFC 1918.
| RFC 1918 Range | Example CIDR Block |
| 10.0.0.0 – 10.255.255.255 (10/8 prefix) | Your VPC must be /16 or smaller, for example, 10.0.0.0/16 |
| 172.16.0.0 – 172.31.255.255 (172.16/12 prefix) | Your VPC must be /16 or smaller, for example, 172.31.0.0/16 |
| 192.168.0.0 – 192.168.255.255 (192.168/16 prefix) | Your VPC can be smaller, for example, 192.168.0.0/20 |
Bigger CIDR blocks are typically better (more flexibility).
Smaller subnets are OK for most use cases.
Consider deploying application tiers per subnet.
Split your high-availability resources across subnets in different availability zones.
VPC peering requires non-overlapping CIDR blocks. This is related to all VPCs in all regions or accounts you want to connect.
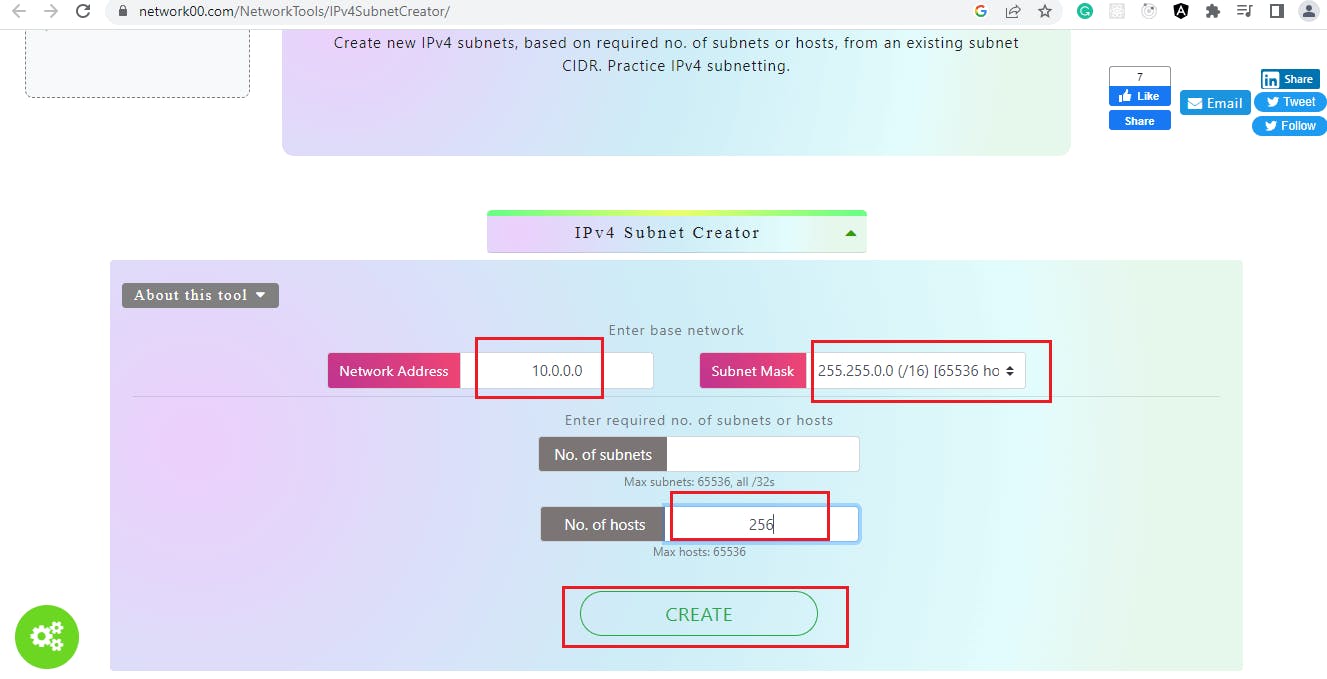
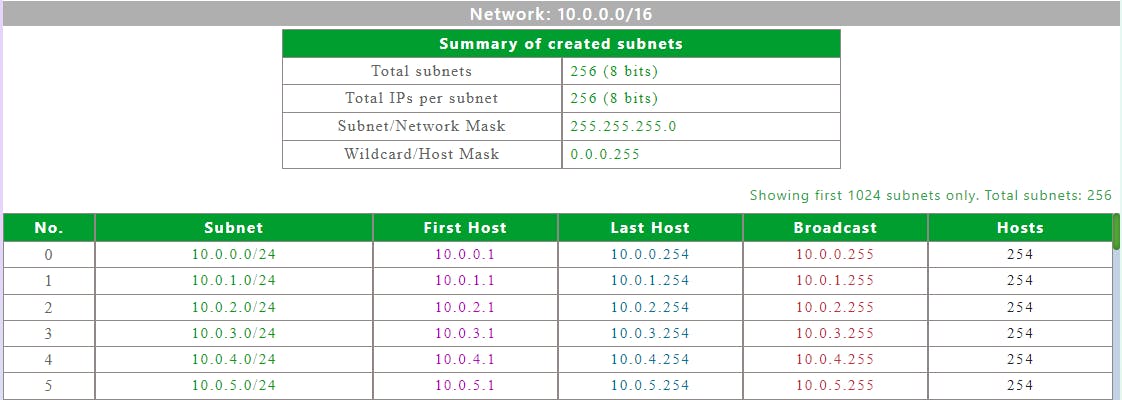
There is a tool to help you create subnets as shown in the screenshot below.
Network ACL
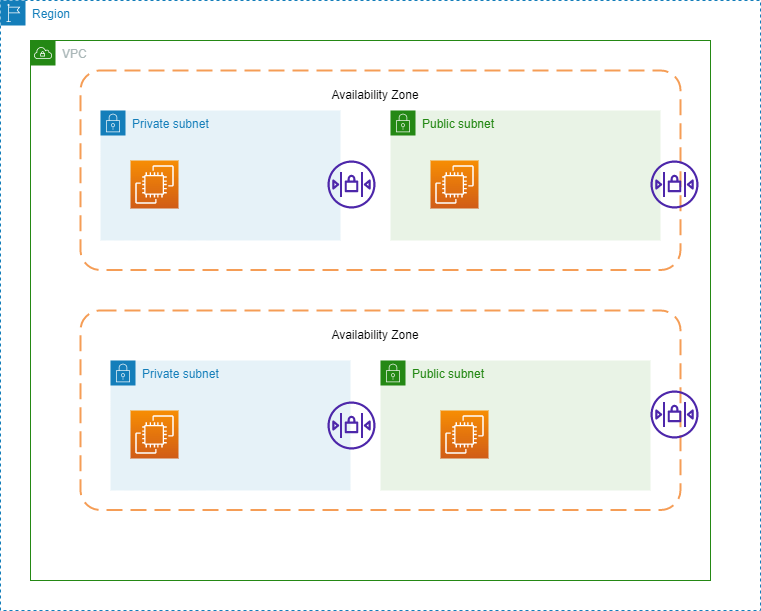
The Network Access Control List (NACL) applies only to traffic entering or exiting the subnet. Also, its scope is limited to subnet only. The below diagram explains network ACL.
Security Groups
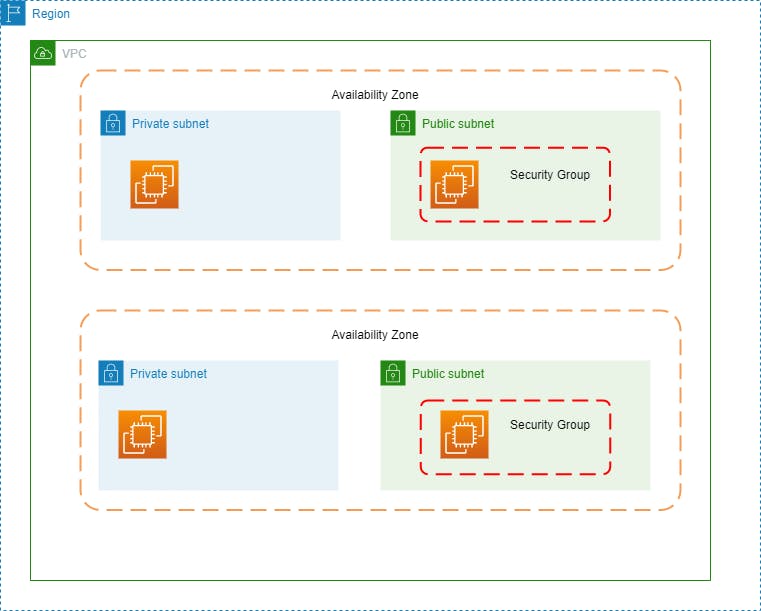
On the other hand, a security group is applied at the instance level of an EC2 instance. So we can have a security group that is applied to several different subnets. That means, it can filter traffic going between instances in the same subnet or across different subnets. Below is the diagram of a security group.
Best Practices For Security Groups
In a typical three-tier architecture for a web application, few resources are public and few of them are private. So, we need to first isolate them one by one and then put public resources such as the user interface of the web application under a security group that accepts an inbound connection under HTTP protocol for port 80 and from any device connected to the internet.
Also, the destination of that public security group could be an EC2 instance under HTTPS protocol, having port 80 which is responsible for running a web server. Now, let's discuss how that EC2 instance will talk to the backend of the application.
The typical security group configuration for that EC2 instance should accept an inbound connection over HTTP protocol under port 80 and it will accept that connection only from the public security group. The destination for that security group for the EC2 instance will be a private security group.
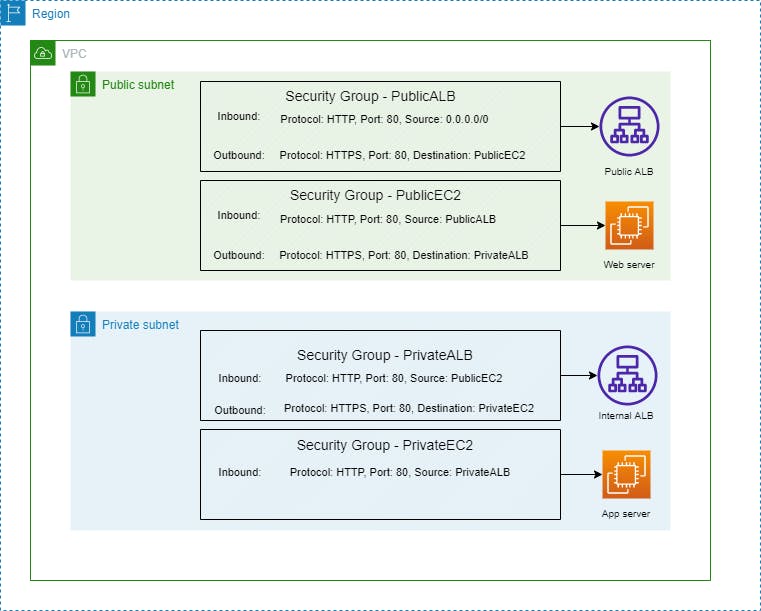
Now, you might ask what resources to put under a private security group. Good question, under that group you have to put only resources that are private in nature. Such as the application server that our web server talks to.
You can configure another EC2 instance with a private security group and can run the application server in that EC2 instance.
Now, let's discuss the differences between stateful and stateless firewalls.
Stateful vs Stateless Firewalls
Actually, the security group is a stateful firewall and Network ACL is a stateless firewall. The stateful firewall allows the return traffic automatically. You just need to set the rule such that the client will allow the inbound traffic to your web server i.e., port 80.
In the case of a security group, if there is no allow rule then there is an implicit deny rule already applied to it.
Whereas in the case of a stateless firewall, it only checks for an allow rule for both inbound and outbound connections. Network ACL (Access Control List) does this.
Final Words
I hope that after completely reading this article on AWS networking essentials, you had a solid ground of knowledge about it. If this article proves helpful to you, don't forget to share it with others, thank you!
