Read the original article here

Form validations are vital when building any kind of web application. Depending on the complexity, we can use two approaches; template-driven approach and reactive approach. This article covers angular reactive forms in-depth so that you don't need to look for other tutorials on the web.
What is Reactive Forms in Angular?
If you are familiar with angular's template-driven approach to validate forms, you know that angular creates FormControl and FormGroup objects itself after we write our code in the template part (i.e, HTML part) of the code.
But, if we want to have more control over our validation logic, then we should use reactive forms. This approach helps to deal with various complex scenarios. For example, suppose you want to build a form where input fields are displayed depending on the data that you get from the server, then you have only one option, you have to use reactive forms.
When we are using reactive forms, we need to explicitly write code to programmatically handle form validations.
Why Use Angular Reactive Forms?
There are a number of advantages of using reactive forms in angular, which are as follows.
Read/ write the value of the input at any point. (Even before the form is built)
Define advanced validation rules, supports asynchronous validators that are especially useful when the user is filling out a form and at the same time an HTTP request is sent to the server.
Be notified and react immediately when the value changes.
Access the native HTML form element.
Reset the form.
Reactive forms are significantly easier to test.
Reactive Forms: How They Actually Work?
In order to understand how reactive forms work, at first you need to know the basics of how template-driven form works. In a reactive-form based approach, we define the form model by FormGroup and FormControl instances in the component's class.
Then we bind the template to the form model, which means our form is not directly modifying the data model. Now, you may ask the question, how to create a form model?
To create a form model, we need to define a FormGroup directive in our form's template part. That FormGroup represents the entire form. A FormGroup contains properties that refer to the state of the form itself. To represent the state, we need to provide an instance of the FormControl object as a key-value pair in FormGroup object.
Following is the example of defining a form model in the component's HTML file.

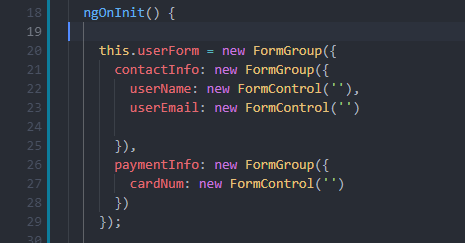
A FormControl object refers to each input element in the form. To bind the input field with the FormControl object we need to specify the FormControlName value in the component's HTML file. Then we need to refer to that value in the component's typescript file.
Following is the example of defining a form model in the component's typescript file.
What is The Use of FormBuilder in Angular?
Sometimes, you need to work with large and complex forms, then you need to repeatedly type "new FormControl('')", "new FormGroup({})". So it becomes a tedious way to represent such large forms. Also, you can hardly read the codes and code debugging may take a long time.
Fortunately, angular helps us out in this regard. You can use FormBuilder class to represent larger, complex forms in such a way so that it is easier to read, understand, debug and maintain.
The following screen-shot is the example of using FormBuilder class.

What is FormArray?
As per angular's official documentation: it tracks the value and validity state of an array of FormControl, FormGroup or FormArray instances.
Let me explain what that means. In simple words, FormArray is a class that makes sure that FormControl instances are put together in an array. You can think of the FormArray class similar to FormGroup class that holds objects of FormControl instances.
So, What Are the Differences Between FormArray and FormGroup in Angular?
Simply saying, FormArray is an alternative to FormGroup for managing an unknown number of form elements. FormArray and FormGroup both allow manipulating form elements.
But, if we compare them then FormArray methods are better because it's methods ensure that the controls are tracked properly in the form's hierarchy.
Another point to be noted is that FormArray's data gets serialized as an array, whereas FormGroup's data is serialized as an object.
Angular Reactive Forms Example
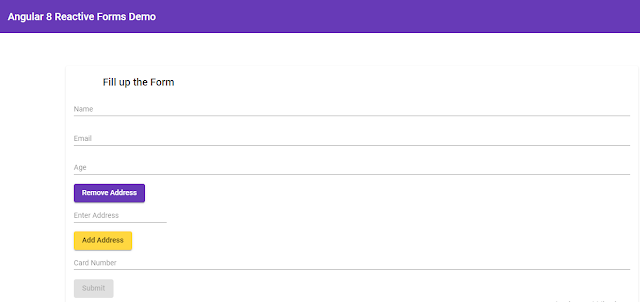
Let's build a form that will collect user's various details such as name, email address, age, address, card number, etc.
Following is the screenshot of the app that we will create.
It would be better if you download the complete project by clicking the button here.
Explanation of app.component.ts File
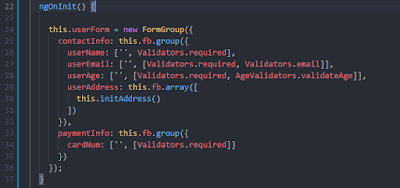
In the screen-shot above, we discussed that we need a form group directive inside which we can put individual child elements inside an object. On line 25, we want to send contact information under "contactInfo" object. That's why we used a form builder object's group function.
Inside that function, we wrote the fields that come under "contactInfo" object, for example, name, age, email, address, etc. Similarly, on line 33, we put the card number field under "paymentInfo" object.
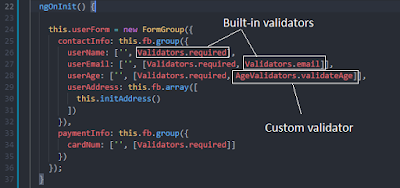
In the above screen-shot, we have used some built-in validators that angular already provides for us to implement. If these built-in validators are not enough for us, then we should go for implementing our own custom validators.
For example, we have implemented a custom age validator that takes care of validating ages that must be between 18 to 60. The code snippet for implementing that validator is shown below.

In order to create a custom validator, we need to implement "ValidatorFn" interface. To do so, we created "validateAge" static function inside "AgeValidators" class. We did this so that we can easily call the function without creating an instance of the class.
This function takes AbstractControl as a parameter and returns ValidationErrors if any errors exist, or null if none exists. To represent "ValidationErrors", we need to return a key-value pair (e.g, "validateAge: true").
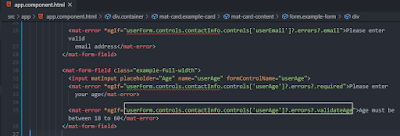
We have written our logic to implement the custom validator, now we have to display the error message whenever a user enters age that is not between 18 to 60. To display that error message we need to write code as shown in the highlighted portion below.
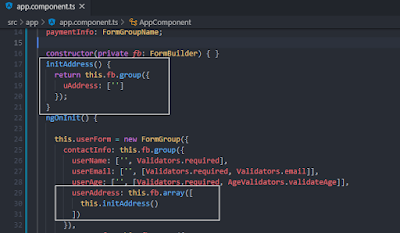
Finally, we have added functionality so that the user can add multiple addresses. To achieve this, we used FormArray. At first, we defined the FormArray under FormBuilder class.
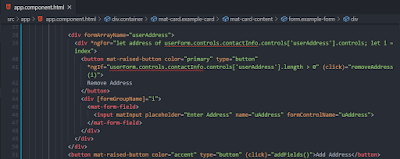
We need to refer to the FormArray instance, in our template file also, we can do that with the help of FormArrayName directive. Then we iterated through all the dynamically added address fields and attached an event called "removeAddress()" to remove address fields at a specific index.
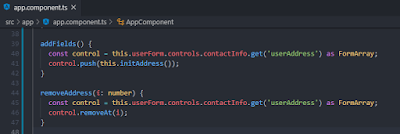
Outside the loop, we added a button that executes "addFields()" event. The code snippet for addFields() and removeAddress() is shown below.
Final Words
I hope that after completely reading this article on angular reactive forms, you have a solid understanding of it. If you have any doubts, you can ask me questions. If this article proves helpful to you, please share it among others. Thank you!
